
Relic Recovery and Restoration by Roland Frodigh
Wednesday, May 18, 2016
Following the Ash
Following the clue of ash in the hole and ash on bullets leads to some excellent recoveries.


Umbrella Inkwells
On this particular afternoon I probed out the corner of a half brick at about 2' depth. You can see the nick on the corner left by the probe. That would lead to some nice glass in the form of umbrella inkwells. Apparently, this soldier's hut site was occupied by some prolific writers. I think mom, sweetheart and those near and dear received many an update from soldier sons and husbands.
Wednesday, September 30, 2015
Excavating a Civil War Hut
The videos below show discoveries made during the excavation of two soldier huts I located using metal detection (vs probing). In each case, the iron, cannister shot and a ration can put me on the firepits of the hut. Expanding them led to the glass, buttons, bullets, iron eating implements and hatpin discoveries. I hope you enjoy these windows into the camp life of a civil war soldier.


Tuesday, September 15, 2015
Powder Flask Restoration
Received this powder flask from a detectorist. It's a fairly straightforward task except that one must be careful not to ruin details while returning the stamped brass to it's original shape and form.


The spout has beeen reattached to the spout mechanism in the image above right and is ready for mounting within the re-shaped top.
Sunday, August 30, 2015
Canteen
About the time I planned to wrap up this hunt, I happened to swing across a signal that blew my ears off. At about one foot depth I saw the telltale rounded edge and strap attachment of a canteen.
Thursday, July 30, 2015
A Hot Late July Hut Dig
After probing for some time, I felt the distinctive crunch of rocks at about the two-foot level. Digging down put me on a hut with lots of ash, broken glass and bone. Sticking with it and digging out to its perimeter yielded many nice artifacts including an umbrella ink. The video of the find can be viewed below.
Tuesday, June 30, 2015
Hut Excavation & Relics
After months of probing out hut sites and coming up with little to show, I finally got into one that yielded several complete bottles and a few other nice relics. I had been surface hunting with great success and hoping to get into a deep cache of relics that often comes with huts. The US buckle was the signal that put me on the hut. Next to the buckle were remains of a soldiers kepi (cloth and buckle) as well as his powder flask.


The shot below shows the recovery of a nice black-glasss Hostetter's bitters pulled from between two rocks adjacent to the firepit.

The short clip below is of the complete canteen that lay next to the soldier's firebox.
Sinking a test hole to find the edge of the hut ,opposite the corner where the initial finds were made, put me on yet more glass. The clip below shows a medicine bottle recovery. More would follow.
In this video, I've just scraped away the dirt, just to the right of my hand in the video still above and inches from the medicine bottle, exposing the embossed panel of a flask. The question, as always, is...intact or broken? My sister was there to record the recovery.

A return visit to the hut firepit yielded the RRR Radway below


Tuesday, April 14, 2015
Confederate Tongue
Well, having just restored a wreath, it is more than appropriate that I post a restoration of a tongue portion to a two-piece buckle. This is a marriage of two buckles to make one. The loop, or keeper portion and the tongue were recovered in different soil types so a color match had to be performed to make this look right. This involved going redder with the loop after it was attached.
I'm often asked how long these take to complete. As you can imagine, it varies. This marriage took about three hours. The remaining tab of brass on the keeper was ground down to make a tab insert, much like a biscuit used in woodworking. After cutting off the remaining keeper from the tongue, I drilled out a corresponding recess into which the other keeper could be inserted, glued and matched. This takes time.


I'm often asked how long these take to complete. As you can imagine, it varies. This marriage took about three hours. The remaining tab of brass on the keeper was ground down to make a tab insert, much like a biscuit used in woodworking. After cutting off the remaining keeper from the tongue, I drilled out a corresponding recess into which the other keeper could be inserted, glued and matched. This takes time.
Monday, April 13, 2015
Confederate Saddle Shield
I was asked to put this rare Confederate relic back to display condition. In addition to being a puzzle, the challenge is to keep it as original as possible. I left some of the bends and creases in the relic so as to retain some originality. A good looking and hard-to-find saddle shield that should hold together for a long time,


Confederate Wreath
I received for restoration the brass wreath portion of a 2-piece CS belt rig that had a twist/bend/break and the collector asked that I perform the repair and restoration.


 The challenge with these is threefold. Bend out the brass without breaking and align the pieces. Secondly, drill out cavities in both pieces in order to insert a shim to bridge for a strong connection. There is little brass to work with so the smallest of drill bits are used (breaking several in the process). Thirdly, matching the existing green where the repairs have been made.
Below are the results of several hours on the bench.


Below are the results of several hours on the bench.
Sunday, March 1, 2015
A Date of Some Import
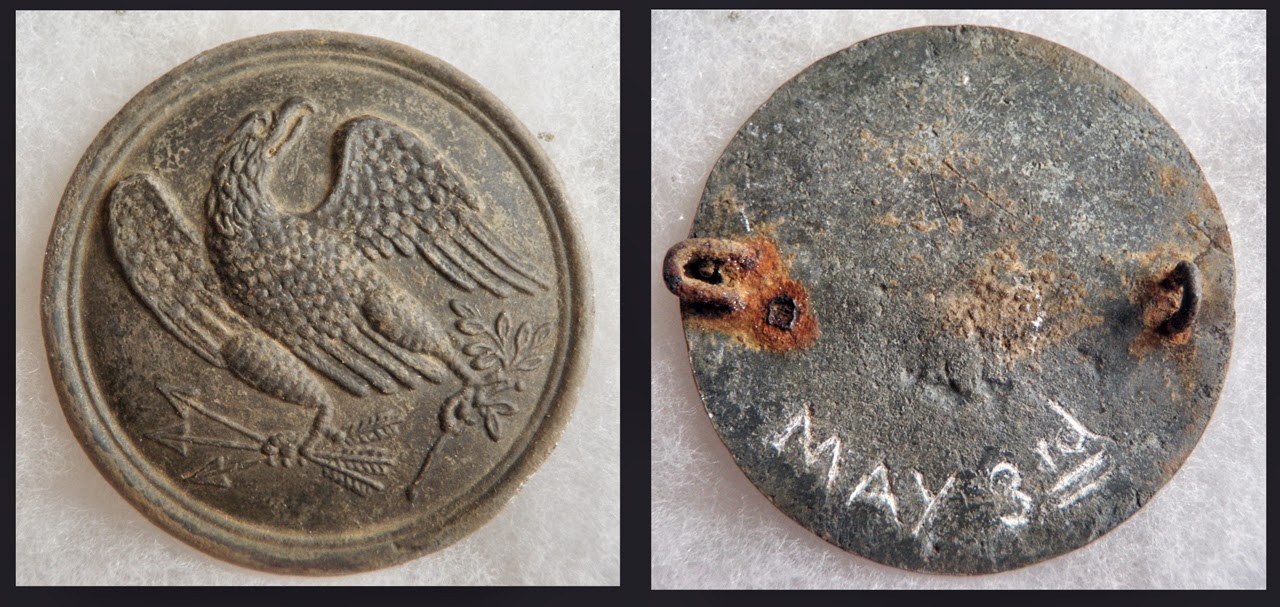
On May 1, 1863 General Robert E. Lee left General Jubal A. Early's division to hold Fredericksburg, while marching with the rest of the army to meet Union Gneral Hooker's main offensive thrust at Chancellorsville. On May 3, the Union VI Corps under Sedgewick, reinforced by John Gibbon's II Corps division, having crossed the Rappahannock River, assaulted and carried the Confederate entrenchments on Marye's Heights. The outnumbered Confederates withdrew and regrouped west and southeast of the town.
The relic was recovered in Fredericksburg, VA.
Tuesday, February 24, 2015
Camp-made Counterfeit
The counterfeiting of coins has been going on since ancient times. No surprise then that some creative , and financially strapped soldiers in our Civil War used their spare time to make spare change. Shown below is a lead half dollar that when freshly poured and minted from a crude mold, would have looked very much like the real thing to someone unused to handling such a large denomination. I was asked to bring out the detail of this relic and have done so by first adding a uniform ground coloration then dusting with white, lead oxide. Prior to this, and upon first glance, this special relic appeared to be little more than a lead disc as seen in the bottom pre-restoration photo.


Monday, February 23, 2015
Rust Removal and Soldier Scratchings
While removing rust from a breakthrough area on the face of this eagle plate, I noticed etchings on the backside. The soldier looks to have carved a flag and perhaps some other items as well. Camp boredom was a huge problem and many a soldier turned idle hands to carving whatever was handy.


Tuesday, January 27, 2015
Returning an Over-cleaned Relic to As-Dug Condition
Here is an example of an over-cleaned Virginia coat button. A wire brush, or more likely, coarse steel wool was used to remove the 155 year old patina. Back in the day this harsh treatment may have been acceptable. Nowadays, anything coming out of the ground is minimally cleaned and certainly never shined. The only plus side of this over-clean was how it created the contrast of the details by hi-lighting them against the dark verdigris of the oxidized brass in the recesses.

 I used a patination acid to oxidize the exposed brass and added a bit of dust to match this to another button the collector cited as coming from the same soil.

 Some details are no longer as visible in the re-patinated version with the loss of the contrast but all details remain physically intact. Patination does not corrode away but leaves a thin salts layer when reacting with the raw metal. All details can be "brought out" as desired by selectively rubbing them up a bit. Doing so however would probably wear through to the underlying brass so I will leave this option to the collector.
Saturday, January 10, 2015
SNY Buckle
This State of New York militia buckle was probably lost during the Peninsula Campaign. I couldn't resist the opportunity to improve its condition and hopefully pass it on to someone who would like to add this to their collection and who appreciates how it looks now. Basically, I have removed some of the high profile oxidation, or "crusties" as I refer to them, filled some voids in the rim, and evened out the overall color. I also removed the digger's marks from the solder fill. I think the work represents an improvement without overdoing the resto'. This plate is available for sale for those who may be interested.


Friday, January 2, 2015
Confederate Artillery: Block A Repair
Here is the rather common CS Artillery button constructed of a brass face, tin back and brass shank. The back is totally gone as you can see and the button has been bent over in half. These have a relatively high copper content making the relic more malleable than most. The repair requires making a back appear like rusted tin and installing the characteristic off-center elongated loop found in these varieties.


Wednesday, December 24, 2014
Some Christmas Eve Restorations
Seen in this picture is a Confederate forked tongue buckle and some other fine Civil War relics that came to me for repair and restoration.
The buckle frame, the only original piece, was without the bar and tongue when it arrived. It was also broken and in an ugly pretzel. Additionally, it was devoid of any consistent patina having been "roughed up" by the plow over so many years. I straightened it out then made the bar and the tongue to fit and attached all. I then gave it all a woods-dug look to bring it all together. That requires layering. As veteran collectors of dug relics know, there is a richness of that look that is difficult to replicate.
The two company letter M relics were broken and both were missing their narrow left legs, the most fragile part of the device. I fabricated, attached and then blended the repairs into the existing look of the relics as dug. The company letter A was broken as well. The trick, or challenge, as always, is how to camouflage break seams while maintaining the originality of the rest of the relic. Whereas I could pretty much go in any direction with the fork-tongue buckle, with the other items, an existing surface attesting to where they were recovered should be retained (my opinion). That super light and soft crust coupled with the great condition of the brass under it makes me believe the letters are Richmond area finds.
The block I infantry button was in several pieces (five). I put that puzzle back together, filled voids, added the back and as with the other relics blended the repairs in with oxides, dirt, dust and whatever else I felt would give it the right look. All in all, a dang good looking display... not destined for the island of misfit relics.

The buckle frame, the only original piece, was without the bar and tongue when it arrived. It was also broken and in an ugly pretzel. Additionally, it was devoid of any consistent patina having been "roughed up" by the plow over so many years. I straightened it out then made the bar and the tongue to fit and attached all. I then gave it all a woods-dug look to bring it all together. That requires layering. As veteran collectors of dug relics know, there is a richness of that look that is difficult to replicate.
The two company letter M relics were broken and both were missing their narrow left legs, the most fragile part of the device. I fabricated, attached and then blended the repairs into the existing look of the relics as dug. The company letter A was broken as well. The trick, or challenge, as always, is how to camouflage break seams while maintaining the originality of the rest of the relic. Whereas I could pretty much go in any direction with the fork-tongue buckle, with the other items, an existing surface attesting to where they were recovered should be retained (my opinion). That super light and soft crust coupled with the great condition of the brass under it makes me believe the letters are Richmond area finds.
The block I infantry button was in several pieces (five). I put that puzzle back together, filled voids, added the back and as with the other relics blended the repairs in with oxides, dirt, dust and whatever else I felt would give it the right look. All in all, a dang good looking display... not destined for the island of misfit relics.
Friday, December 19, 2014
My Olde Site: Getting Older
My Olde Site, a federal era (or earlier) cellar hole,produced these american indian artifacts at the deepest levels. I've been informeed that the two pieces in the foreground are made of steatite, a type of soapstone quarried and carved by the indigenous tribes. The large chunk on the left is a portion of the side of what was once a large bowl. The smaller item is some kind of bowl. The rounded stone is what I believe to be a masher and is the only smooth stone of its kind to come out of the ground at this site.


Plate Straightening
This rather unusual excavated sword belt plate required straightening and touch ups to make displayable. I suspect that many plough hits over the years has resulted in the significant distortion.
Applying pressure using several clamps simultaneously allowed for a break-less outcome. Touch ups to some cracks along the edges and face resulted in a pretty good restoration.
What device was originally on the face of this plate is a mystery. Several possibilities exist and these can be found in the many reference books on buckles and plates of the period.


Applying pressure using several clamps simultaneously allowed for a break-less outcome. Touch ups to some cracks along the edges and face resulted in a pretty good restoration.
What device was originally on the face of this plate is a mystery. Several possibilities exist and these can be found in the many reference books on buckles and plates of the period.
Subscribe to:
Posts (Atom)